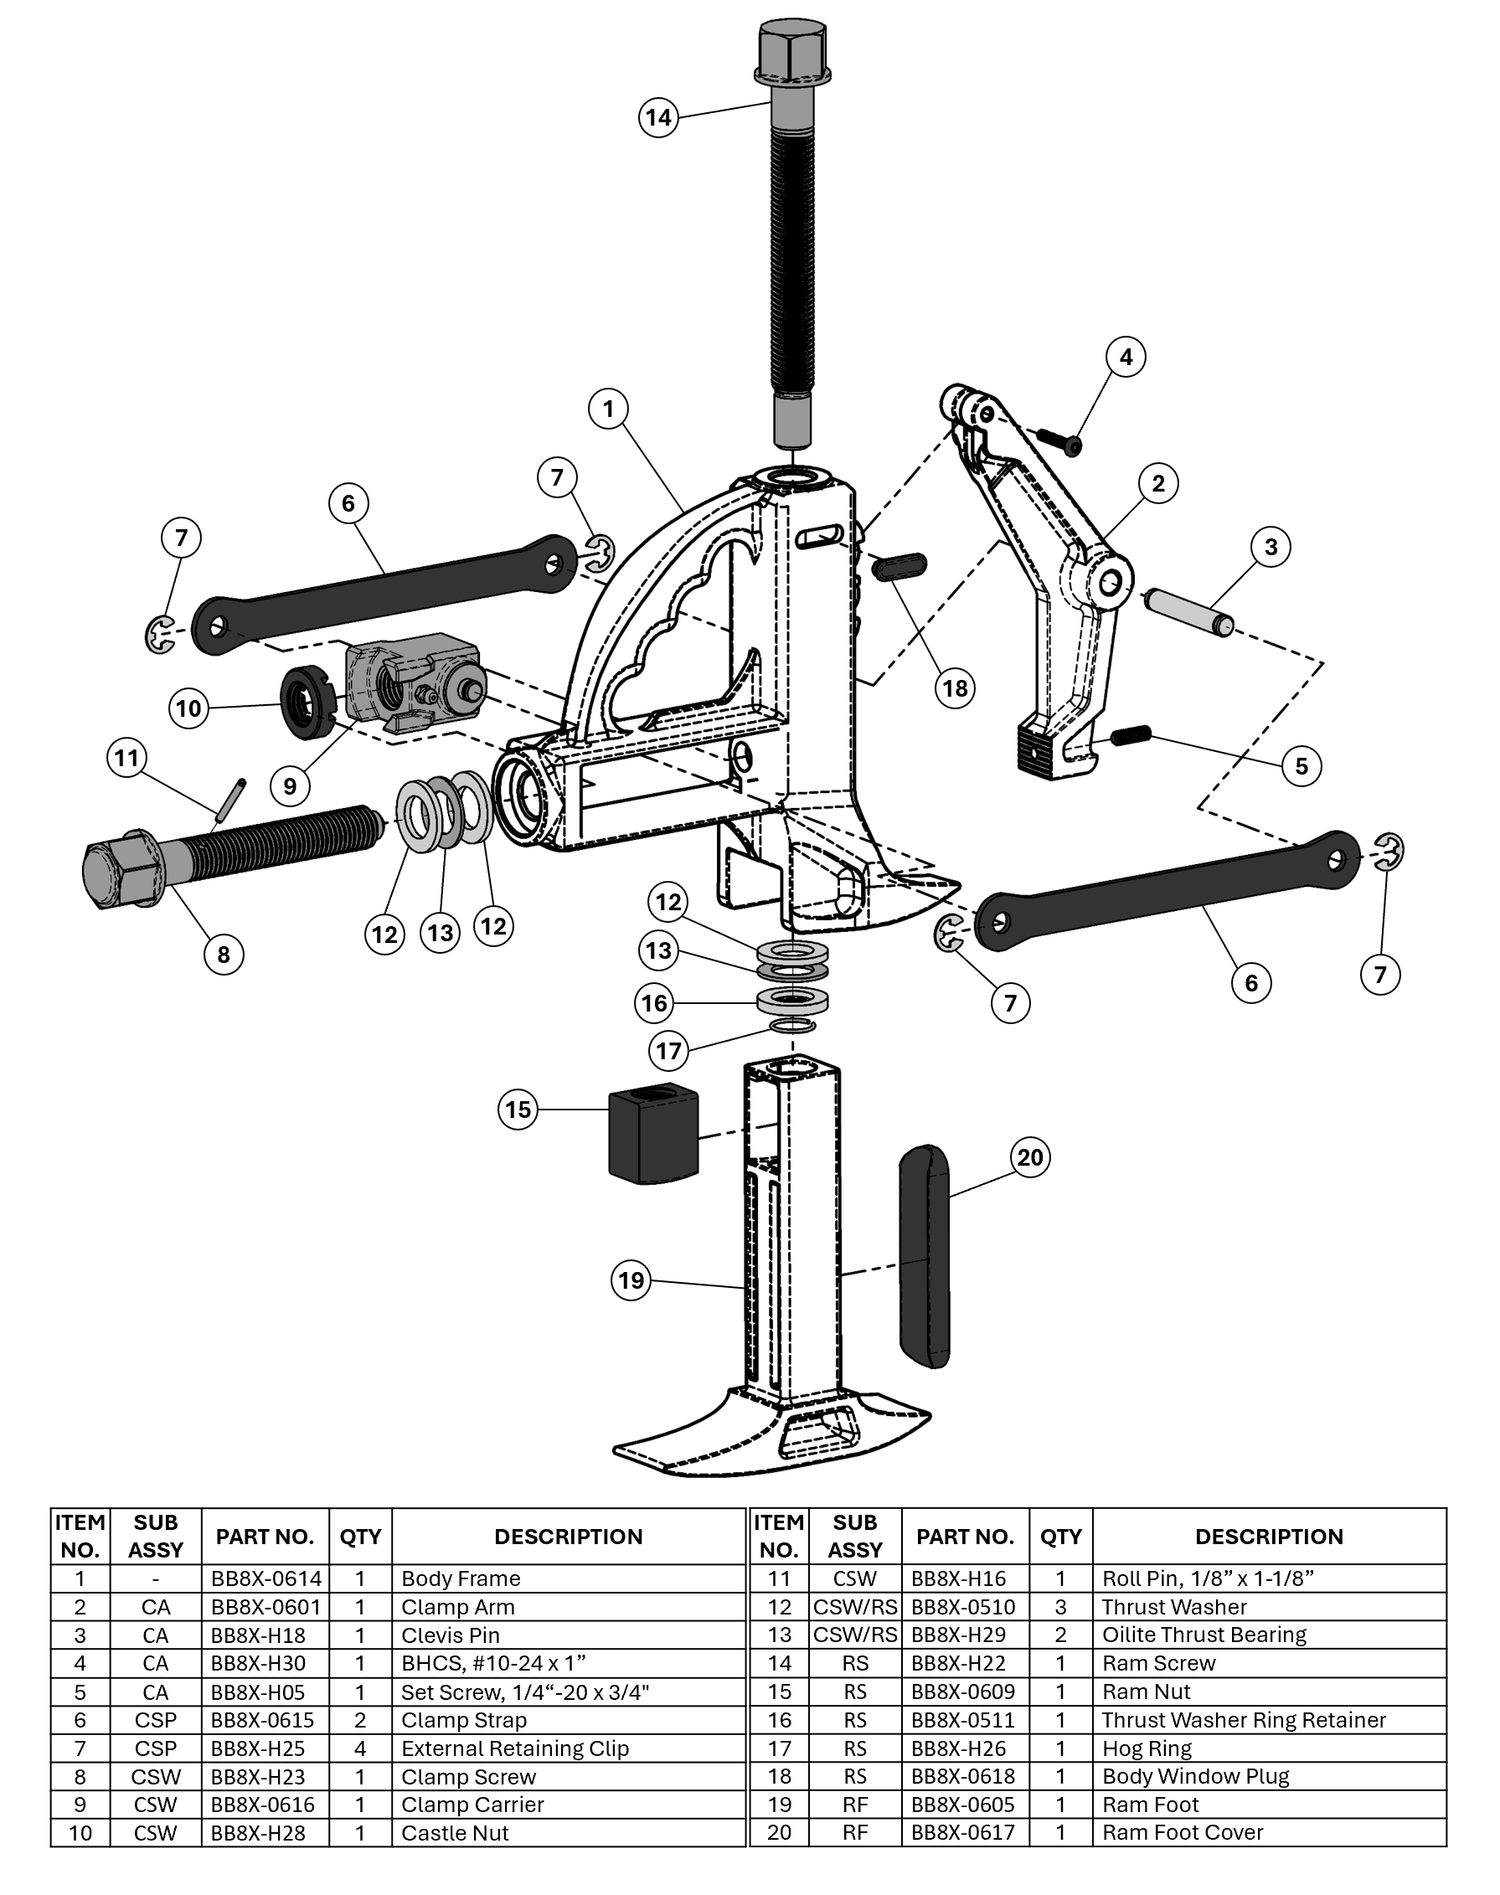
DOWNLOAD THE MANUAL
DETAILED INSTRUCTIONS, TIPS & TRICKS

PROFESSIONAL FEATURES:
- HARDENED ALLOY STEEL CONSTRUCTION
- ASTM-A574 ACME SCREWS
- 2-SIDED RAM FOOT (COMBI & MAXI/EURO-STYLE)
- 2-POSITION CLAMP HINGE
- 3-YEAR WARRANTY
The BeadBuster XB-650i INDUSTRIAL was designed to work on ANY Large 1-PC, 2-PC & 3-PC Wheel
APPLICATIONS
The BeadBuster XB-650i INDUSTRIAL will work on Large 1-PC, 2-PC and 3-PC Wheels. (Not compatible with 5-PC wheels)
-

1-PC WHEEL
Larger wheels such as Tractors, Wheel Loaders, Skid Steers, OTR Construction Vehicles, etc.
-

2-PC WHEEL
A less common style, but found on Fork Lifts, Heavy Trucks, Military Vehicles, etc.
-

3-PC WHEEL
Telehandlers, Wheel Loaders, Graders, Haulers, Military Trucks, Mining Equipment, etc.


The XB-650i was designed to replace the function and application of the common styles of Hydraulic Bead Breakers from all manufacturers. The convertible features make it a direct replacement for the COMBI, MAXI, and EURO STYLE Hydraulic Bead Breakers giving it a 3-in-1 functionality, while being half the weight, more powerful, and free of hydraulic hoses. Check out the full design evolution of the XB-650i.
-

"COMBI STYLE"
-

"MAXI STYLE"
-

"EURO STYLE"


The XB-650i is equipped with a 2-Sided Ram Foot, which emulates the geometry of both the COMBI & MAXI style Hydraulic Bead Breakers. Simply run down the Ram Foot until it reaches the end of its threads, and the Foot can be removed and flipped around. Use care to avoid cross threading while re-installing the Ram Foot.
-

SHORT SIDE RAM FOOT “COMBI”
This will work for the majority of 1-PC, 2-PC & 3-PC wheel applications.
-

The XB-650i Ram Foot is capable of a Max pushing force of 28.7 Tons, and 4 in of stroke.
-

LONG SIDE RAM FOOT “MAXI”
This will work on 3-PC wheels with extended flanges that have replaced older 5-PC wheels.


DUAL CLAMP ARM POSITION FOR DIFFERENT FLANGE WIDTHS
The XB-650i has (2) different Clamp Arm Hinge positions, an UPPER and LOWER position. The Clamp Arm can be removed by taking out the Clamp Hinge Screw with a 1/8” Hex Key.
The end of the Clamp Arm has a Set Screw that can be pushed out to get a better grip on hard-to-clamp wheels. Use a 1/8” Hex Key to adjust this Set Screw as well.
-

UPPER HINGE POSITION
This will be most commonly used with typical flange widths on 3-PC wheels.
-

LOWER HINGE POSITION
This can be used with wider flanges, allowing the Clamp Arm to reach further and around a
wider rim flange.


INSTRUCTIONS FOR USING THE XB-650i INDUSTRIAL
-
1. PREPARE THE WHEEL
- Chock the wheels opposite the jack.
- Jack up the vehicle.
- Crib the vehicle with safety stands or blocking devices after jacking it up. Do not work under an unblocked load.
- Remove the valve core; deflate tires completely.
-

2. MOUNT THE BEAD BREAKER
- Apply tire lubricant to the rim flange and tire bead.
- Insert the tip of the ram feet in between the rim and tire bead.
- Using a hammer to urge the feet in place is discouraged,
but if necessary, strike the back of the clamp screw.
-

3. CLAMP TO RIM
- Once the feet are well seated under the lip of the rim, run down the Clamp Screw with an Impact Wrench and a 1-1/8” socket.
- Running the Clamp Screw CLOCKWISE will pull in the Clamp Arm, and COUNTER CLOCKWISE will extend the Clamp Arm.
- Apply more tire lubricant as needed, and run the clamp until the tool body is roughly perpendicular to the face of the rim.
- The tool can be tipped in toward the rim by a maximum of 5° past perpendicular.
-

4. BREAK THE BEAD
- Once the tool is in a mounted position, run down the Ram Screw with an Impact Wrench and a 1-1/8” socket.
- Running the Ram Screw CLOCKWISE will extend the Ram Foot, and COUNTER CLOCKWISE will retract the Ram Foot.
- The Max useful travel of the Ram Foot is 4 in., and the operator must be mindful to not extend the foot past that limit.


>>> CAUTION!! <<< RAM FOOT TRAVEL LIMIT
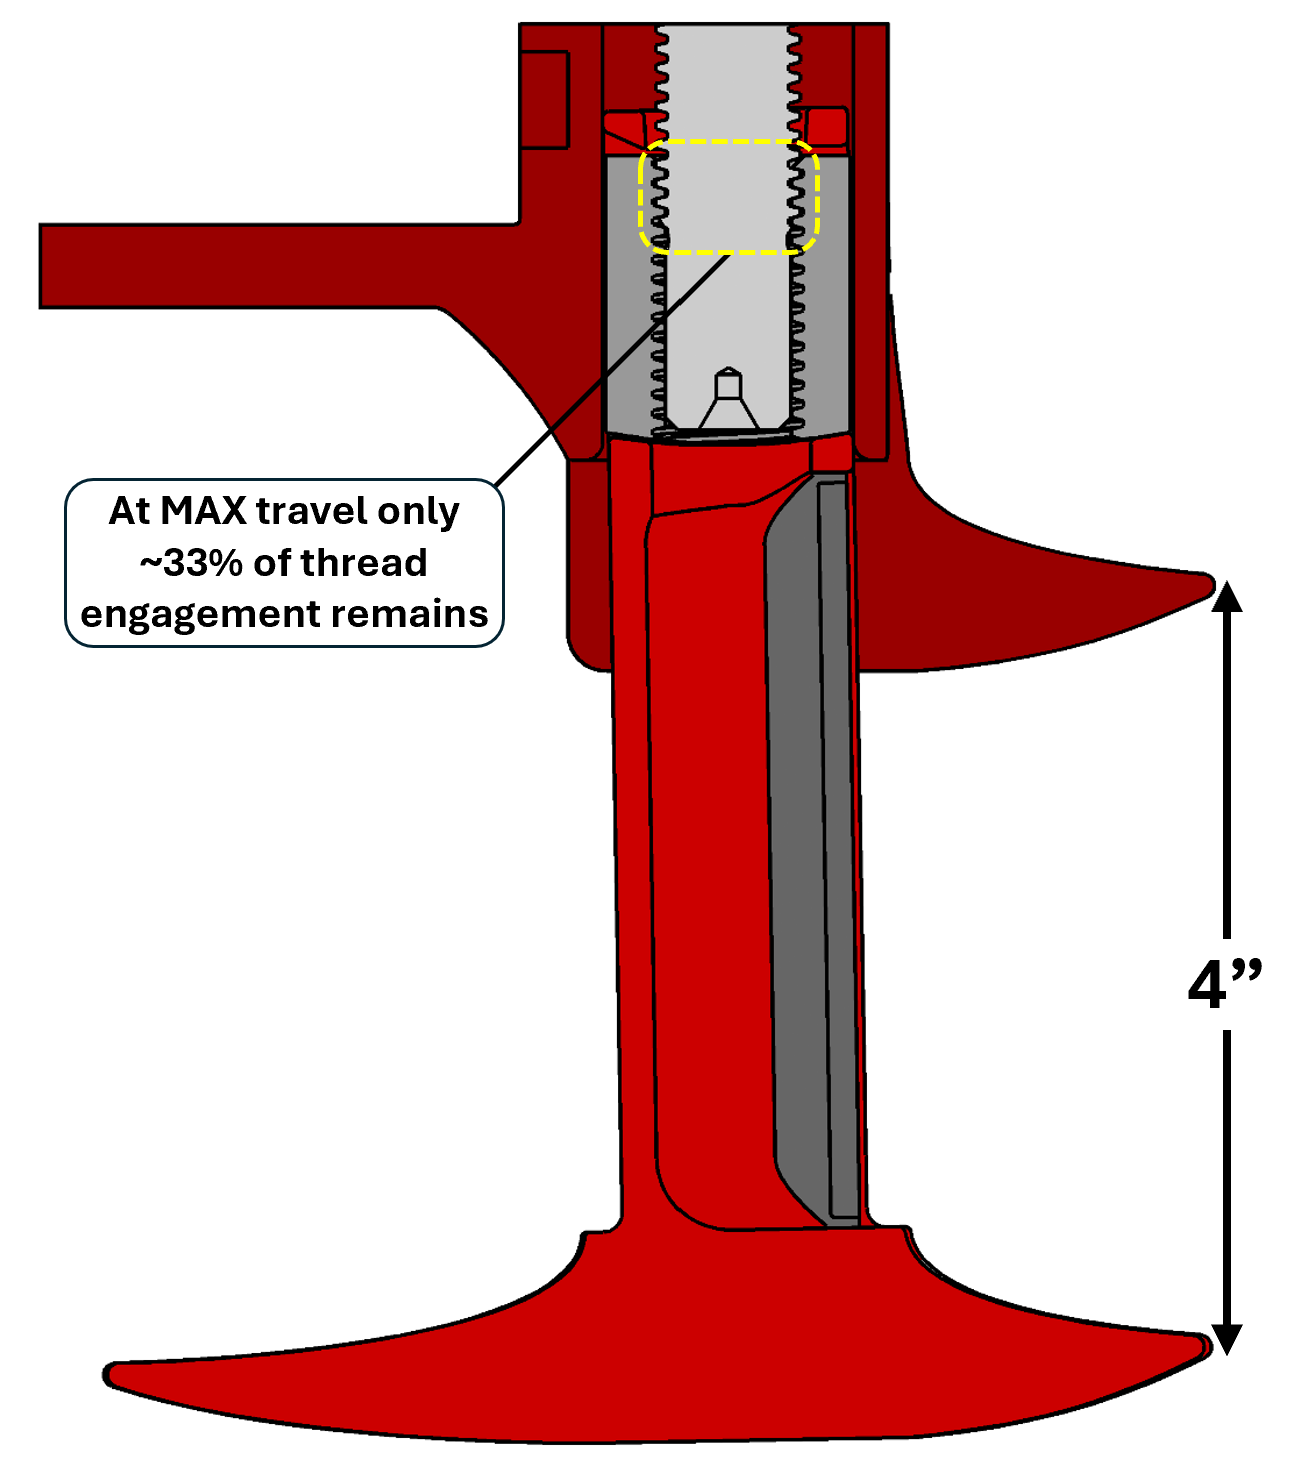
The XB-650i Ram Foot is designed to have a MAX travel of 4 in. It is not necessary to push the sidewall more than this to break the bead.
At MAX travel, the Ram threads have roughly 33% of normal thread engagement. If the Ram Screw is run down until the Foot stops advancing, the threads will be disengaged and only the back pressure of the tire will keep the Foot in place. There are features in the Ram Screw to help the threads re-engage, but care must be used when returning the Ram Foot to not get cross-threaded.
To return the Ram Foot after it has stopped advancing, go slow and stop if the threads seem to have unusual resistance.
There are visual markers on both sides of the Ram Foot to act as a visual indicator when you are nearing the end of the 4” Travel Limit. The operator should make a practice of looking for these indicators when using the tool to prevent over-extension of the Ram Foot.
-

COMBI MODE
Top of the grooves being visible is the End-of-Travel indicator
-

MAXI MODE
Top of the Ram Foot Cover being visible is the End-of-Travel indicator


5. MOVE AROUND THE RIM AND REPEAT
- After breaking the Tire Bead in one spot, return the Ram Foot and open up the Clamp, and move the tool to another location 8-10 in along the circumference of the wheel, and repeat the bead breaking procedure.
- Repeat this process 3 or 4 times around the Wheel Flange as necessary to completely break the Tire Bead.
MAINTENANCE
-

GREASE THE CLAMP CARRIER
Apply fresh grease to the clamp carrier using the grease fitting after every 50-100 uses, or at least once per season.
The XB-650i is greased at the factory with White Lithium grease with PTFE additive. This is preferred, but any general purpose grease will work.
-

GREASE THE RAM THREADS
Remove the Ram Foot Cover with pliers and/or a small flat head screw driver, clean out the old dirty grease and pack with fresh grease. You must leave enough room in the Ram Foot Cavity for the Ram Screw and the Ram Foot Cover.
No more than 0.60 oz (17.6 ml, 3.5 tsp) of grease should be used to refill the Cavity. This will correspond to roughly 24% of the cavity volume being filled with grease. If too much grease is used, excess will squeeze out with the next use, and potentially impair tool function.
Re-grease after every 50-100 uses, or at least once per season. After re-greasing, replace the Ram Foot Cover and set it in place with a mallet.